
You must follow strict guidelines when handling a 18650 battery or any lithium-ion battery. Always check the positive side, which usually features a button top, and the negative side, which appears flat. Look for the positive terminal near the logo and use a multimeter for confirmation. Never guess the terminal orientation. Safety remains critical during every battery installation, especially when charging 18650 lithium-ion batteries safely. Proper identification of each 18650 battery terminal prevents damage and ensures reliable performance.
Examine the 18650 battery for clear markings or the manufacturer’s logo to find the positive terminal.
The negative terminal sits on the flat end of the 18650 battery.
Key Takeaways
Always identify the positive terminal by looking for the raised button top or ‘+’ symbol and the negative terminal by the flat end or ‘-‘ symbol before using a 18650 battery.
Use a multimeter to confirm battery polarity when markings are unclear or both ends look similar to avoid incorrect installation and potential damage.
Charge 18650 batteries only with proper chargers, follow safety precautions like monitoring temperature and avoiding damaged batteries, and use protection circuits to prevent accidents and extend battery life.
Part 1: 18650 Battery Terminal Identification
1.1 Terminal Features
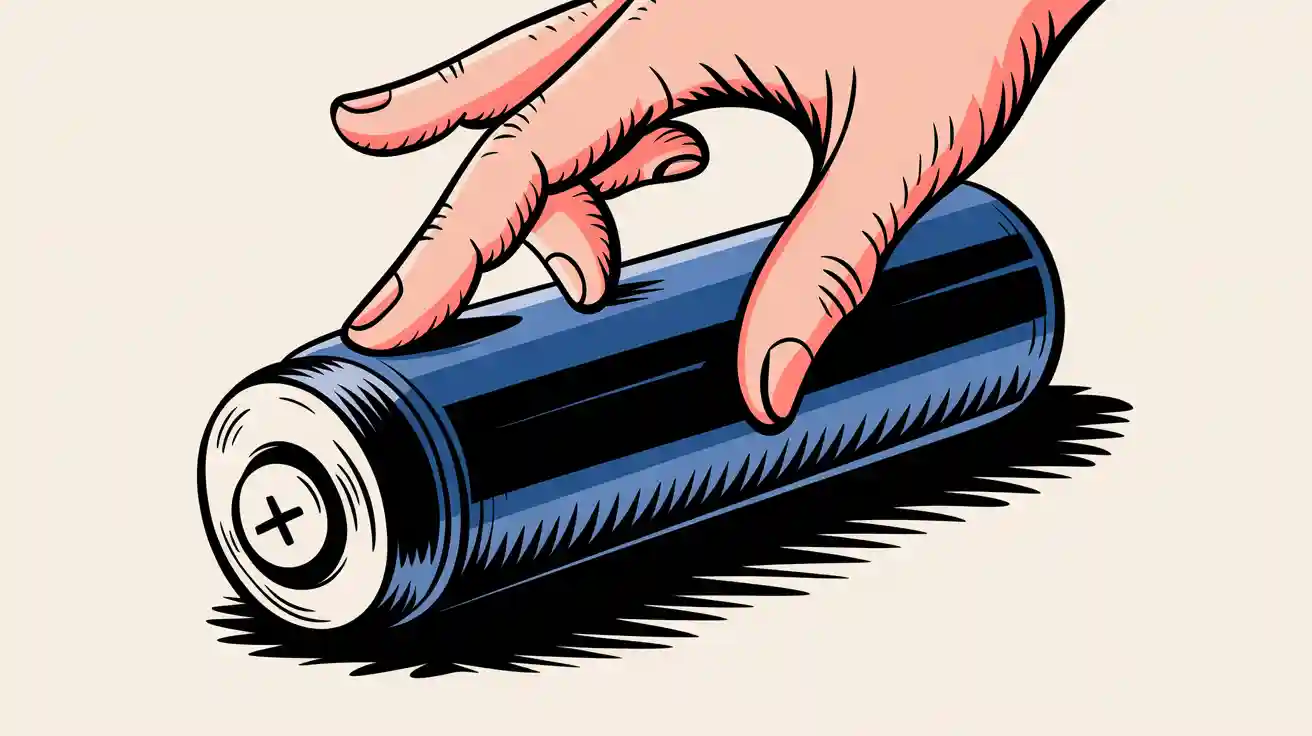
When you inspect a 18650 battery, you notice distinct physical features that help you identify each terminal. The positive side usually has a raised button top, which stands out from the flat negative side. This button top design ensures a secure connection in devices and prevents reverse installation. You may also find a concave ring around the positive terminal, adding another layer of visual distinction.
The flat end of the 18650 battery is almost always the negative side.
The positive side features a protruding button or nub.
Some batteries have both ends flat, so visual identification alone may not be reliable.
The positive terminal is often larger, rounded, or protruding, while the negative terminal is flat or recessed.
Tip: Always check for a button top when handling a 18650 battery. This design helps you quickly identify the positive side and ensures proper alignment in battery packs.
Industry standards require clear polarity markings and color coding to prevent reverse connections. You often see a “+” symbol or red color for the positive terminal and a “-” symbol or black color for the negative side. These markings help you avoid mistakes during installation and maintain safety in lithium-ion battery packs.
Feature | Positive Side | Negative Side |
|---|---|---|
Shape | Raised button/nub | Flat or recessed |
Color | Red (often) | Black (often) |
Symbol | “+” | “-“ |
Additional Markings | Concave ring possible | None |
1.2 Logo Markings
Manufacturers often use logo orientation and specific markings to help you identify the correct terminal. You may see the “+” and “-” symbols printed near the ends of the 18650 battery. Some brands use color coding, with red for the positive side and black or blue for the negative side. The logo itself can provide clues; for example, the left side of the logo may indicate the positive terminal, while the right side marks the negative side.
LG HG2 batteries have four connection points and textured insulator rings on the positive side.
Genuine HG2 washers feature a matte finish, while fake ones appear glossy.
Panasonic 18650 BD batteries display a circular positive terminal with three connection points.
Panasonic BE models have a sharp, triangular positive terminal and a unique indented ridge on the negative side.
Note: Always verify the authenticity of your 18650 battery by checking for consistent markings, washer texture, and machine-made scratches. Irregular or shiny washers may indicate counterfeit cells, which can compromise safety and performance.
1.3 Multimeter Use
Visual inspection is not always enough, especially when markings are unclear or both ends appear flat. You should use a multimeter to confirm the polarity of your 18650 battery. Set your multimeter to DC voltage mode. Place the red probe on one end and the black probe on the other. If you connect the red probe to the positive terminal and the black probe to the negative side, you will see a positive voltage reading. Reversing the probes gives you a negative reading.
Place the red probe on the suspected positive side and the black probe on the negative side.
A positive voltage reading confirms correct polarity.
Reversing the probes results in a negative voltage reading.
If the battery is depleted, readings may be unstable or reversed, indicating malfunction.
Safety Alert: Always confirm polarity with a multimeter before installing a 18650 battery in a lithium-ion battery pack. This step prevents reverse connections, short circuits, and device damage.
Industry standards such as IEC 60417 and ISO 7010 require clear polarity markings and safe installation practices. You must follow these guidelines to ensure compliance and protect your equipment.
Part 2: Charging 18650 Lithium-Ion Batteries Safely
Charging 18650 lithium-ion batteries safely is essential for maintaining battery performance, preventing explosion, and ensuring the longevity of your battery packs. Whether you manage battery systems for consumer electronics, industrial automation, or security systems, you must follow strict guidelines for installation, safety, and protection. This section provides a comprehensive overview of best practices for charging 18650 lithium-ion batteries safely, with a focus on battery packs and professional applications.
2.1 Installation Steps
Proper installation of a 18650 battery is the foundation of safe operation and reliable performance. You must align the battery terminals correctly and secure each cell within the battery pack to avoid explosion or accident. Follow these steps to ensure correct polarity and installation:
Identify the positive (+) and negative (-) terminals on both the 18650 battery and the battery holder.
Insert the battery so that the positive end aligns with the holder’s positive terminal and the negative end aligns with the negative terminal.
Securely close the holder to ensure a good electrical connection.
Always verify the polarity before connecting the battery to avoid damage or explosion.
Confirm the battery fits snugly and terminals align correctly before final use.
You can use a multimeter to determine the positive and negative ends of the battery compartment by measuring voltage or continuity. This step ensures correct polarity identification before installing the 18650 battery. For battery packs, arrange cells in holders or spacers to maintain stable alignment and prevent movement. Use insulating materials, such as fish paper rings, over the positive ends to prevent shorts. Double-check that all positive and negative ends face according to the wiring diagram before any welding or soldering. Re-check the layout to avoid misalignment that can cause stress, shorts, or explosion.
Tip: Always inspect each 18650 battery for physical damage, swelling, or leaks before installation. Damaged batteries increase the risk of explosion and should never be used in battery packs.
2.2 Safety Precautions
Charging 18650 lithium-ion batteries safely requires strict adherence to safety precautions. You must inspect each battery for damage, leaks, or deformities before charging. Insert batteries correctly, aligning positive and negative terminals as per charger markings. Use only chargers designed for 18650 lithium-ion batteries to match voltage and charging characteristics. Charge at recommended currents (typically 0.5A to 2A) and avoid using chargers meant for other battery types.
Monitor charging progress and remove batteries once fully charged; never leave batteries unattended.
Charge in well-ventilated, non-flammable areas away from extreme temperatures and direct sunlight.
Stop charging immediately if you detect excessive heat, swelling, or unusual odors.
Store batteries in protective cases after charging to prevent short circuits and explosion.
Regularly clean charger terminals to maintain efficiency and safety.
Maintain the charging temperature within 0°C to 45°C. Charging below 0°C risks lithium plating, which causes permanent capacity loss and internal damage. Charging above 45°C increases internal pressure, leading to electrolyte breakdown, gas formation, swelling, and potential explosion. Always follow manufacturer recommendations and avoid DIY charging methods.
Safety Alert: Never charge damaged or swollen batteries. If you notice swelling or ballooning during charging, stop immediately, disconnect the battery, and place it in a safe, non-flammable area.
Branded chargers offer advanced safety features and are strongly recommended for charging 18650 lithium-ion batteries safely. The table below compares leading charger brands:
Brand | Key Features and Strengths | Notes on Usage and Safety |
|---|---|---|
Nitecore | Advanced technology, precise charging algorithms, high-quality and user-friendly designs | Recommended for smart charging to prevent overcharge |
XTAR | Affordable, reliable, multiple charging slots | Suitable for beginners and experienced users |
Efest | Popular in vaping community, direct power input, essential safety features | Trusted for safety and extensive use |
Branded lithium-ion battery chargers include essential safety features such as overcharge protection, overcurrent protection, overtemperature protection, and short circuit protection. These features prevent battery damage, explosion, and safety hazards. They use advanced charging algorithms like the Constant Current-Constant Voltage (CC-CV) method, which efficiently manages charging phases to maximize battery capacity and extend lifespan. In contrast, generic chargers may lack these safety mechanisms, potentially causing inefficient charging, battery stress, and reduced battery longevity.
To maximize the lifespan of your 18650 battery, avoid overcharging and undercharging by using a quality charger with automatic shutdown. Store batteries at room temperature (20-25°C) and recharge at 20-30% capacity. Avoid high current loads and deep discharges, and store batteries at about 50% charge in cool, dry places when not in use. Clean battery contacts regularly and prevent physical damage by careful handling and using protective cases.
Note: Failing to follow manufacturer guidelines can cause microscopic metal particles inside the battery to create internal short circuits, leading to thermal runaway and explosion. Always treat lithium-ion batteries with care to prevent accidents and ensure safety.
2.3 Protection Circuits
Protection circuits play a critical role in charging 18650 lithium-ion batteries safely. These circuits monitor battery voltage and current to keep operation within safe limits. Overcharge protection prevents charging beyond maximum voltage, avoiding overheating or explosion. Short circuit protection detects and interrupts power flow to prevent damage and fire hazards. Additional protections include over-discharge protection and overcurrent safeguards.
A protection circuit board (PCB) is often integrated into protected 18650 batteries. This board guards against excessive charging, discharging, and circuit breaks, and it also protects against extreme temperatures. Unprotected batteries lack these safety features, making them more prone to overheating, venting, or explosion if mishandled. Protection circuits prevent damage to both the battery and the device by interrupting unsafe conditions.
Feature | Protected 18650 Battery | Unprotected 18650 Battery |
|---|---|---|
Safety Features | Includes built-in protection circuit monitoring voltage, temperature, and current to prevent overcharging, overheating, short circuits, and over-discharging | No built-in protection circuit, higher risk of unsafe conditions |
Safety Level | Enhanced safety, significantly reduces risk of battery damage, fire, or explosion during charging | Requires careful handling due to lack of safety circuit |
User Suitability | Recommended for beginners or users prioritizing safety | Suitable for advanced users who need higher power output |
Size | Slightly larger due to added protection circuit | Smaller and lighter |
Output Performance | May limit current to maintain safety, affecting high-drain devices | Higher output but with increased safety risk |
Cost | More expensive due to added safety features | Less expensive |
Protection circuit boards monitor voltage, current, and temperature to stop charging if unsafe conditions arise. Common causes of charging accidents include overcharging, using wrong or damaged chargers, charging in extreme temperatures, and short circuits. Protection circuits help prevent these issues by shutting down or limiting charging when thresholds are exceeded. Following manufacturer instructions and using protected batteries reduces risks of fire, explosion, and battery damage.
Tip: For battery packs in medical, robotics, security system, infrastructure, consumer electronics, and industrial applications, always use a Battery Management System (BMS) for advanced monitoring and protection. For more information on application scenarios, see Medical, Robotics, Security System, Infrastructure, Consumer Electronics, and Industrial solutions.
Charging 18650 lithium-ion batteries safely requires a combination of correct installation, strict safety precautions, and robust protection circuits. By following these guidelines, you can prevent explosion, extend battery life, and ensure reliable operation in all battery pack applications.
You must identify 18650 battery terminals accurately and install each battery with care. Protection circuits play a vital role in preventing explosions and fires. Key safety features include:
PTC resistors and CID devices limit current and disconnect unsafe batteries.
Venting mechanisms and Battery Management Systems monitor and protect battery packs.
Statistic Description | Data / Value |
|---|---|
Failure rate (modern) | 1 in 10 million |
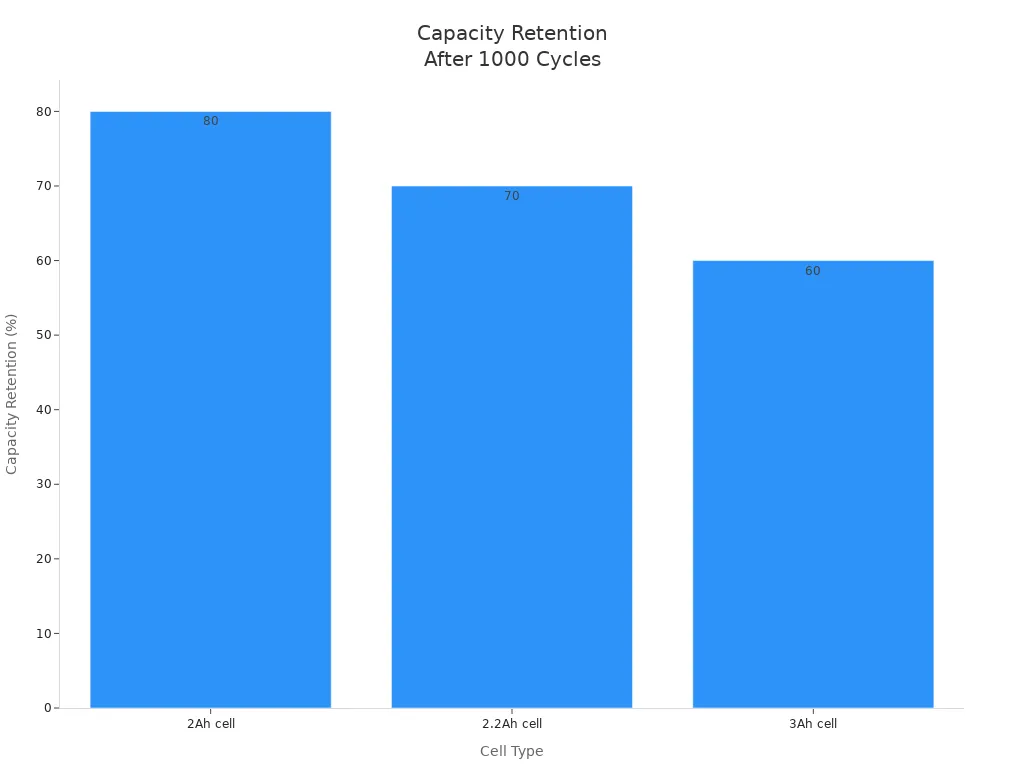
Capacity retention (2Ah, 1000 cycles) | 80% |
Follow manufacturer guidelines and use branded chargers to extend battery life and ensure safe operation of every lithium-ion battery.
FAQ
1. How do you confirm the polarity of a 18650 lithium-ion battery pack?
You can check the button top for positive and the flat end for negative. Use a multimeter for final confirmation before installation.
2. What is the difference between protected and unprotected 18650 cells?
Type | Protection Circuit | Safety Level | Application Scenario |
|---|---|---|---|
Protected | Yes | High | |
Unprotected | No | Moderate |
3. Where can you get custom lithium battery pack solutions for your business?
You can contact Large Power for custom consultation and tailored lithium battery pack solutions for your specific application needs.


